Wednesday, December 29, 2010

Irish Cream Cheesecake, made Gluten-Free, but not Calorie-Free

We had a delightful, relaxing Christmas holiday spent with my sister Mandy. There was lots of good food, a bracing walking of the dog, the viewing of several films, and good conversation. Before I get to the wonderful food, I thought I would also share the results of the first Crazy Mug competition which I am hoping will be a family tradition for years to come.

I had the idea to get our family involved in a little Yuletide fun by scouring yard sales, thrift shops and other outlets for the craziest, zaniest coffee mugs one could find. I was inspired early this year by the bizarre clown mug you see below, and thought it would be a fun scavenger hunt for us to engage in and make part of our holiday festivities. (Plus the activity fit in with our "It's a Recessionary Christmas" theme this year.) We already have lots of fun with the humorous gift tags that we put on our Christmas presents (they provide clues to the gift within or are purportedly from different gift-givers in our lives) and I thought this would add to the merriment.

Well, only Dan and I and Daughter #1 were imbued with the Crazy Mug Spirit, but we still got a kick out of the unveiling of the mugs. Below you see the Crazy Mug entries.


The Penguin mug was actually judged to be rather cute, and we feel we could even use it to drink from, so that was quickly out of contention.

In any other year I think my strange Crazy Mug entry, featuring a badly-drawn, roller-skating clown peeping backwards through his well-defined buttocks would have been judged the winner....


But this was quickly eclipsed by Dan's winning entry, "Smashed Again". Dan had purveyed the glassware shelves of many a thrift shop and actually came up with the winning Crazy Mug at an antiques shop where the owner gave him the mug for free because the tail was broken off of the creepily anthropomorphic mouse figure attached to the handle. Mr. Mouse is staring down at a flattened mouse friend at the bottom of the mug.

This mug is so Crazy on so many levels. Why "smashed again" on a mug? Doesn't one drink booze out of a glass ordinarily? And how does one clean this twisted bit of pottery? And who wants to drink out of something that has a dead mouse in it, real mouse or not? No matter, Dan has won the first Annual Crazy Mug Christmas Contest and I am already looking forward to creating a trophy for next year's event.


Onto the Christmas Food! We had some mulled cider, cheese and crackers, a vegetable platter and dip and a first course salad, Pepperonata with Goat Cheese Truffles, which I had tried in an earlier post. With the addition of some red pepper poinsettias (I had a small flower cookie cutter on hand for that trick) and substituting spinach for the blanched arugula in the original recipe, this was a festive red and green starter for us. I also rolled smaller goat cheese truffles, and rolled the green ones in snipped parsley. Perfetto!

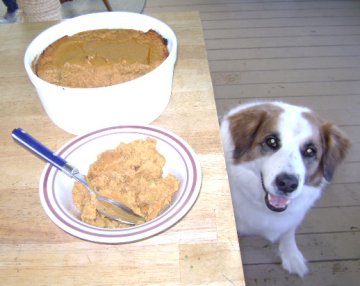
Then there were two trays of lasagna, one meaty and wheaty for my carnivorous crew and one tray of Mushroom, Artichoke and Spinach Lasagna made with rice noodles for the vegetarian, gluten-free crowd. The Christmas feasting concluded with a rich Irish Cream Cheesecake. My cousin-in-law's wonderful wife Diane had once made us such a delight one holiday season and Dan had very fond memories of it, so I dug out the recipe she had given me and figured out a gluten-free crust to replace her graham cracker version and this proved to be a delicious and successful experiment.

I double checked various celiac sites to make sure the Irish Cream liqueur is gluten-free (the consensus is that distilled spirits are gluten-free, even if they start out with glutenous grains). I used Bailey's Irish Cream liqueur but am intrigued by other recipes for making homemade Irish Cream liqueur, like this one. I started this cheesecake the day before, by making and chilling the crust and then baked the cake early on Christmas morning because it takes a long while to cool after baking.


Gluten-Free Irish Cream Cheesecake

2 Tbsp. softened butter

1-1/2 cups Honey-Nut Chex cereal
1-1/4 cups finely chopped walnuts
6 Tbsp. butter, melted


3 (8 oz.) pkgs. cream cheese, at room temperature

3/4 cup granulated sugar
3 eggs, beaten
1/3 cup Irish Cream liqueur
1 tsp. vanilla

3 oz. white chocolate, grated on box grater (save a handful for garnish)

1-1/2 cup sour cream
1/4 cup confectioner's sugar


Butter the bottom and sides of a 9 inch springform pan with softened butter. Set aside.

Place Honey Nut Chex in zipped plastic bag. Smash with rolling pin until you get fine crumbs. One could also do this in a food processor. Mix crumbs thoroughly with melted butter and chopped nuts. Press into the bottom and halfway up the sides of the buttered springform pan. Cover with plastic wrap and chill in refrigerator for at least one hour to let harden.

Preheat oven to 325 degrees F.

Beat softened cream cheese with mixer until fluffy. Add in sugar and mix well. Add eggs, Irish Cream liqueur and vanilla. Mix well. Mix in grated white chocolate and mix well.

Pour into prepared crust. Bake 60 minutes or until the edges of the cheesecake are puffed up and dry looking and the center is set.

Cool on rack.

When cheesecake is thoroughly cooled, top with a mixture of the sour cream and confectioner's sugar. Spread topping smoothly and garnish with reserved grated white chocolate. (Don't garnish with Turbinado or other sugar crystals as we did because they will dissolve and make the top of the cheesecake strangely wet, causing the dessert chef some concern and involving much blotting with paper napkins before serving).

Wrap cheesecake with plastic wrap and chill in refrigerator for at least 6 hours before serving.

Makes 10-12 very rich dessert servings.

With many happy wishes to my Crispy Cook readers and blogger buddies for a delightful rest of the year and for a happy, healthy, peaceful and prosperous New Year!

Wednesday, December 8, 2010

Basler Brunsli, A Swiss Holiday Cookie That's Naturally Gluten-Free

I have been happily getting started on our holiday baking traditions. My late mother-in-law was the Provider of Chex Mix to all the family members and I am filling in with my gluten-free version (I add more kinds of salted nuts, gluten-free pretzels and more spicy seasonings and replace the chow mein noodles and broken bagel chips she preferred). Those are baked, packaged and several containers are secretly stashed where I will hopefully find them again during Christmas week.

The cookie baking is also gearing up with a couple of batches of brownies stashed in the freezer and the remnants of a test batch of a cool new holiday cookie from Switzerland, Basler Brunsli. I spied this naturally gluten-free recipe in my vintage cookbook "Woman's Day Gifts From Your Kitchen" (NY: Simon and Schuster, 1976), and after experimenting with it, I am smitten with this aromatic, chewy cookie.

The cookie calls for ground almonds. I stocked up on whole almonds from the bulk bin of my grocery store ($7.00 per pound) and then ground them up in my blender. The cookie also called for kirsch, also known as kirschwasser, which is a cherry liqueur. My local liquor store had a small, dust-covered bottle. I suppose the rise of cherry-flavored cough syrup and other cold remedies has diluted the popularity of this particular alcohol. It does have a strong cherry scent and flavor, but it is perfect for offsetting the chocolate and clove elements of this wonderful cookie.


I had to wrestle with the dough a bit. The cookbook recipe calls for one to roll out the dough on a board lightly sprinkled with sugar and then cut out the cookies in the traditional rosette shape. However, the raw cookie dough was so moist that it slowly sloshed around my mixing bowl and I couldn't see handling it even between waxed or parchment paper. I tried freezing the dough, but the kirsch kept the dough from freezing or firming up, so in the end I just pinched off bits with a metal spoon and plopped them onto parchment-lined baking sheets. They spread to a 1-1/2 inch diameter when baked.

The spiciness of the ground cloves and cherry and chocolate flavors is perfectly balanced and they are exquisite with a cup of hot tea. I think they are more of cookie for an adult palate, being not too sweet or gooey or eye-catching. The texture is wonderful too. They are crisp, yet chewy and are not brittle, so they will make good candidates for holiday gift packages.


Here then is my version of Basler Brunsli, my new found holiday favorite confection:

Basler Brunsli

1 cup granulated sugar
1 cup ground almonds
1/2 cup grated unsweetened chocolate (one square of baking chocolate, grated on a cheese grater)
2 Tbsp. kirsch
1 tsp. ground cinnamon
1/4 tsp. ground cloves

2 egg whites


Combine all ingredients in a medium bowl, except for egg whites. Do not give in to the temptation to add more cloves than a level 1/4 tsp. as this flavoring will already be a dominant note in the finished product. And this advice comes from a baker who likes a lot of spice.

In a separate bowl, beat eggs whites until almost stiff. Fold in almond-chocolate mixture and mix thoroughly, yet gently. Divide dough in half and maneuver each half into a log. Cover with plastic wrap and chill for at least one hour.

Preheat oven to 325 degrees F. Place teaspoonfuls of cookie dough onto two parchment-lined baking sheets. Try to maneuver dough into a round shape. Each cookie should be separated by at least an inch or two from its cookie neighbor as these will spread while baking.

Bake 12-15 minutes, or until cookie tops are no longer shiny.

Let cool on baking sheets for five minutes before gently removing them from the parchment with a slender spatula onto baking racks.

Makes 2 dozen cookies.


I'll be linking this post up with Maggie of She Let Them Eat Cake and her 12 Days of Gluten-Free Christmas Cookies event on December 12. Check back with Maggie then to see all the other GF sweets others have cooked up this holiday season. But do try these Basler Brunsli cookies if you enjoy a spicy, chewy cookie, even if it is rather plain-looking next to some of its showier, wonderfully decorated neighbors on the holiday cookie plate this season.

You might also enjoy trying some other of my cookie recipes:

Rudolph's Noses

Almond Cloud Cookies

Flourless Fudge Brownies

Elegant Sesame-Ginger Cookies


Fig Newtons

Mexican Cinnamon Cookies (Polvorones de Canela)

Ginger-Nut Lace Cookies


Mocha-Pepper Sandwich Cookies

Lemon Bars


Peanut Butter Kisses

Apricot-Ginger Shortbread

Wednesday, December 1, 2010

Turning up the HEAT to Cook the Books

Time to Cook the Books again, dear readers. No, it's not tax time, but time to post about the latest book selection from the greatest online foodie book club, Cook the Books, which I and two dear blogger friends started up two years ago. Johanna of Food Junkie, Not Junk Food and Deb of Kahakai Kitchen and I take turns hosting each bimonthly round of Cook the Books, and this time it is the lovely Johanna who is leading our discussion of Bill Buford's book "Heat: An Amateur's Adventures as Kitchen Slave, Line Cook, Pasta-Maker, and Apprentice to a Dante-Quoting Butcher in Tuscany" (NY: Alfred A. Knopf, 2006).


This is a very entertaining memoir by Buford, a founding editor of Granta and writer/editor for The New Yorker, who left the literary life to pursue his passion for the culinary arts. Buford signs on to work as a grunt with Mario Batali at his three-star restaurant Babbo and so we get a backstage pass to the testosterone-fueled, invective-filled world of a high-profile New York City restaurant kitchen. Much of the book focuses on the Mario Batali back story, but I was actually more intrigued by two others who lie within the Rabelaisian orbit of Planet Mario, Joe Bastianich and Marco Pierre White.

Joe is the laconic scion of the Bastianich restaurant empire and Batali's business partner. He knows food and wine and how to keep the finances afloat in the Batali restaurant galaxy. He does not wax poetic about the glamour of restaurant life, having had to clean out the grease traps, pull bay leaves out of choking throats and sweep up piles of post-exterminator insect detritus in the family restaurant.

Marco Pierre White is an even more outrageous, larger-than-life character than Batali, who endured a four-month stint as White's kitchen slave in London before quitting in a fit of pique. White is so very foul-mouthed, so mean, so physically intimidating, as described by Buford, that even when the two meet, over a frightfully proper traditional roast grouse meal at White's newest restaurant acquisition, he works himself into an increasingly cold fury ruminating on every bit of the dish that is overdone or incorrectly prepared. There are croutons that are insufficiently darkened, a sauce that is too intense, butter that is not foamy enough, and an overabundance of parsley garnish. Each rant is punctuated by his dining partner's name, so that the reader feels the tension ratchet up with each seemingly polite, yet darkly ominous, phrase from White's lips:

"It's not right, is it, Bill?"

"It is made with a veal stock reduction, isn't it, Bill?"

"The bread crumbs, they're disappointing, aren't they, Bill?

"The butter sauce, ...I mean, really...One clove, [of garlic] do you understand me, Bill?"

"We're here to eat a f*$&@#ing bird, are we not, Bill?"

You get the point.

The other passage from Buford's book that really stuck with me was his description of how the Food Network packages its food celebrities (called "talents" or "brands") and their shows. They are less reliant on the quality of the cooking information so much as the sensual, lip-smacking, groaning-while-chewing presentation skills of the talent. Buford describes it further:

"The skin-flick feel was reinforced by a range of heightened effects, especially amplified sounds of frying, snapping, crunching, chewing, swallowing...The "talent" (also known as a "crossover" personality, usually a woman with a big smile and no apron) was directed to be easy with her tongue and use it conspicuously--to taste food on a spoon, say, or work it around a batter-coated beater, or clean the lips with it". (p. 143)

Seems like Julia Child wouldn't cut it these days with her data-laden French Chef episodes. But I still like to watch her chirpy reruns, which I guess makes me hopelessly old-fashioned.

It was hard to decide on a dish I wanted to prepare in honor of this book as there was a parade of cooks described in its pages. Ultimately I decided to try a recipe by Le Grand Orange, Mario Batali. I waded through a thicket of his online recipes without being inspired. So many of them consist of meaty meat plugged with other bits of meat, wrapped in layers of yet more flesh. I do see that he is planning a new book focusing on vegetables, so that should be interesting to pore over.

Ultimately, I ended up making a very elegant Batali appetizer (though we ate it for dinner, at least the gourmet type adults did), Goat Cheese Truffles with Peperonata. Now I can see that he has a dab hand at vegetarian fare and so he is back in my good graces.

To make this wonderful dish, you take some arugula, blanch it for 10 SECONDS, whereupon it wilts into submission, like spinach and becomes a whole new vegetable with a delicate texture and taste. Magical!

You then toss your blanched arugula with a lemony dressing, put a little mound on a plate, top it with red pepper strips slow-cooked with sherry vinegar, and then top these with goat cheese "truffles" rolled in paprika, crushed fennel seed (Mario says fennel pollen) and poppy seed. It was spectacularly good and changed my mind about arugula. I have only used it fresh in salads, but the blanching technique made me fall in love with this salad green which is actually still hanging out in the lettuce patch outside the Crispy Casita. Will definitely plant more arugula next Spring.


I would only change things up by making smaller, more bite-sized goat cheese truffles next time. Wouldn't this make a spectacular salad or first course menu item for an elegant Christmas dinner with the play of red and green?

Please join us after the December 3 deadline for this round of Cook the Books to see all the thoughtful and tantalizing entries. Anyone is welcome to join in our book club. There's no entry requirements other than reading our selected foodcentric book and then blogging up a post about the book and a dish that you have cooked up which is inspired by your reading. A guest judge reviews the roundup of posts and then picks a winner who receives a fabulous Cook the Books trophy badge to adorn his or her blog.

Our December/January Cook the Books selection will be Victoria Riccardi's "Untangling My Chopsticks: A Culinary Sojourn in Kyoto" and I will be hosting the book discussion and roundup with Ms. Riccardi herself serving as our guest judge. Please join us!

Monday, November 29, 2010

WHB Hosting and the Gluten Free Food Find of the Week: Poha

When groceries are so inexpensive at the Asian markets in Albany, I feel free to grab packets and bottles and cans of interesting-looking new edibles and fling them in my cart without remorse. We've discovered so many great naturally gluten-free new foods (one must still read labels diligently though) including new varieties of rice, a world of gluten-free noodles from all kinds of culinary traditions, and wildly exotic spices and sauces.

One of my new favorite discoveries is poha (also spelled pohe), a Western Indian comfort food. Poha is a quick cooking product made of pounded or flattened rice that is available in either thick or thin varieties. I bought a package of thick poha for $1.89 at the Indian Bazaar on Central Avenue in Albany that contained 4 cups of poha, enough for two separate dinners for our family of four.

According to my blogger colleague TongueTicklers, poha is one of the first solid foods that children smack their gums upon. She also notes that a dish of poha is a favorite breakfast or snack food and gets packed in many a lunchtime tiffin, whether it is cooked up savory or sweet. Since I have more of a salt tooth, I went savory for my poha test drives.


First I cooked up TongueTicklers' recipe for Kaanda Pohe, which pairs poha with sliced potatoes, which sounds like altogether too much starch, but which blends together beautifully. I added some (well, a lot) curry leaves that I sauteed with the spices and this was an aromatic and belly-filling dinner indeed. You soak your poha in water for a short while and then drain it in a colander. It absorbs the liquid and becomes sort of spongy, rather like a rolled oat, with a delightfully chewy texture.

I also tried poha again a week later without the peanuts, topped with the chopped up last blast of cilantro from the garden. Another winner.


Scheduled next on the Crispy Cook poha experiment trials will be this recipe for Mane Adige's recipe for Gojjavalakki, in which you whir your poha around in the blender or food processor and cook it up with tamarind, rasam powder and other spices. Sounds divine. But gotta trek back down to the Big City to buy more poha!

I am going to include this poha post in this week's edition of Weekend Herb Blogging, which is now in its fifth year, making it one of the Grand Old Dames of food blogging events. Weekend Herb Blogging started over at Kalyn's Kitchen and is now run by Haalo of Cook Almost Anything. The weekly event includes posts about edible plant ingredients, whether they be fruits, vegetables, seeds, grains, legumes, herbs, or flowers. I always find out about new ingredients and new ways to prepare old favorites with this event.


As the guest host of Weekend Herb Blogging #262, I would love to showcase your blog post, which may contain a recipe or information about growing or using a plant ingredient, to include in my recap after this week's deadline of Sunday, December 5, midnight Eastern Standard Time. WHB submissions must include a link back to The Crispy Cook and to Haalo's WHB rules link. WHB submissions must also be specifically written for this blog event and not cross-posted to other blog events.

In your email submission (to oldsaratogabooks AT gmaildot coM) please include the following information:

* Your Name
* Your Blog Name/URL
* Your Post URL
* Your Location
* Attach a photo (please check the details below for specific photo requirements)

Looking forward to seeing what you and other great cooks from around the world will be submitting!

Wednesday, November 17, 2010

Countdown to our Gluten-Free Thanksgiving 2010

Preparing a gluten-free Thanksgiving feast takes a bit of planning and reconnaissance in the kitchen, but adding in other dietary considerations (some of my family members are vegetarians) adds another layer of thinking about recipes.

Since receiving the celiac diagnosis five years ago, I've been planning and cooking meals that are mostly gluten-free and mostly pescatarian or vegetarian, including our family's Thanksgiving meal, but this year I'm making things easier on myself by making it all gluten-free.

Not that I'm telling my holiday family and guests, mind you.

I will let the vegetarians know that aside from a roast turkey and accompanying gravy, they are free to roam the Thanksgiving table without fear of ingesting meat. And I will whisper in my husband's ear that he may do the same without being glutened. My Thanksgiving gift to him. And not incidentally, to me, as the Chief and Crispiest of Cooks.

I still plan a lavish spread (because I love to cook, I love to eat, I love to have leftovers during a busy retail season at our bookstore, because I have teenagers) but I will not be making gluten-free AND Gluteny kinds of stuffings, two kinds of desserts, etc. etc. as I have in the past. I think I have just gotten to a different mindset about cooking in my kitchen as we have tried to transition from our previous cooking/eating ways to a gluten-free lifestyle.


Whereas right after the G-bomb hit with my husband's diagnosis I was overwhelmed with the enormity of having to retool the kitchen, rethink my repertoire of recipes and cooking methods, and relearn how to bake (fuhgeddaboutit!), I am now more at ease with shopping and cooking gluten-free than not. Weird.

I'm certainly planning to be less mentally CRISPY a cook when I am putting the finishing touches on my Thanksgiving spread and calling everyone to the table. If anyone asks about whether things are gluten-free before the feasting is over, I plan to get a distracted look and hurry off to say "I forgot to put out the salt and pepper", or "I forgot to turn off the stove". I will only let slip that the entire deliciousness is gluten-free after the fact, when they are lulled into a post-prandial daze.

At least, that's my devious plan. Keep your fingers crossed for me on my secretive gluten-free guerrilla assault on my otherwise GF-wary diners.

Here's my game plan for a totally Gluten-Free Thanksgiving Feast:

Nibbles:

Magical Muhammara (a fantastic Middle Eastern dip courtesy of author Diana Abu-Jaber, I sub in GF bread crumbs)
Grandma's Stuffed Celery
Cream Cheese Glazed with Garlic-Rosemary Jelly (recipe to follow in another post this week)
GF Crackers (Sesame-Rosemary Crackers if I'm extra-ambitious, but more likely a couple of packages of store-bought Nut Thins)


Main Event:

Roast Turkey with Pan Gravy (for the omnivores)
Roast Portabellas with Rice Stuffing and Mushroom Gravy (for the vegetarians)

Mashed Potatoes
Copper Pennies Salad
Sweet Potato Pudding
Cole Slaw
Green Bean Casserole with Crunchy Fried Onions (courtesy of Jill of Hey, That Tastes Good!)
Apple Chutney (with dried cranberries thrown in to macerate for a couple of days)
Cornbread Dressing
Brussels Sprouts with Lemon Balm Vinaigrette
Relish Tray (olives, carrot sticks and Dilly Beans)
GF Parker House Rolls (courtesy of Art of Gluten-Free Baking)


Sweet Finale:

Apple Sour Cream Pie
Impossible Vegan Pumpkin Pie (courtesy of the Fat Free Vegan)
Chocolate Dipped Strawberries


My daughter and I made a batch of these Chocolate Dipped Strawberries during the summer, to serve as an elegant ending for our wedding anniversary dinner and I was amazed at how ridiculously easy they were. They look so beautiful that I had always assumed they were difficult to assemble, but after perusing some cookbooks and Internet recipes I came up with this breezy way to make these simple little show stoppers.

Chocolate Dipped Strawberries


1 lb. fresh strawberries, hulls left on, rinsed and patted dry

1 (8 oz.) pkg. gluten-free milk chocolate chips

1-2 Tbsp. vegetable shortening

Melt chocolate chips in double boiler over low heat. Stir often. When chips are fully melted, add in shortening as needed to achieve a runny, liquid texture.

Line a cookie sheet with waxed paper.

Holding strawberries by hulls, dip in melted chocolate to coat on all sides except hull. Place gently on waxed paper to cool.

That's it! Chill when cooled. You can also get fancier with these dessert treats by swirling on lines of melted white chocolate or dipping their little bottoms in crushed nuts while they are still warm.

I'm sending this Thanksgiving 2010 post over to Shirley at Gluten-Free Easily, whom I had the pleasure of meeting in person recently. She is a lovely, supersmart lady who shares her gluten-free recipes, entertaining ideas, health information and so much more on her wonderful blog. Shirley's hosting week 2 of a Gluten-Free Holiday series sponsored by Amy of Simply Sugar and Gluten Free and Shirley's theme this week is Thanksgiving Favorites.

Hop on over to Gluten-Free Easily to see what other bloggers are planning for their Turkey Day. I just visited and see that my tentative feast menu may be subject to change based on some droolworthy options over there. You can also leave comments there to enter to win some wonderful cookbooks.

Monday, November 8, 2010

The Crispy Cook Meets Betty Crocker

Man, this past week I was the Extra, Extra Crispy Cook. I helped organize our school's annual arts and music festival on Friday, went on the road with a good bit of our used bookshop at the Chronicle's Autumn Leaves Book Fair in Glens Falls on Saturday, and worked at the shop and home at computer central in between. But even more wild was my beginning of the week adventure in Minneapolis to meet with a brigade of marketing mavens and what seemed like half the staff of the General Mills corporate headquarters.


Yours truly and ten other gluten-free blogger buddies were invited by General Mills to come for an intensive day of sessions to let the company know about the gluten-free lifestyle and how we shop, cook and live to keep our families healthy. This company, one of the world's largest food manufacturers, makes and sells some of the most popular food brands in North America, including Betty Crocker, Progresso, Yoplait, Old El Paso, Green Giant, Pillsbury, and Haagen Dazs (hurray for Rum Raisin!) so even though I generally cook from scratch, I was intrigued about being asked for my input and pleased to see that such a large company was interested in making more food options available for the gluten-free community.


I was psyched to meet so many passionate, articulate gluten-free bloggers during the day. Here's Amy of The Savvy Celiac, a great source of information and news and Minnesota area recommendations, with Cinde of Gluten Free Taste of Home, whose blog is all about gluten-free product reviews and giveaways (Amy's the blonde, Cinde's the brunette). And that's Danna Korn in profile on the far left, a rock star in the GF community who is the author of the several great books about living gluten-free, including Gluten Free for Dummies which I have recommended to many others who are new to the GF diet. Danna is also the founder of R.O.C.K. (Raising our Celiac Kids), a support group for parents. My local readers may be interested to know that there is a Glens Falls R.O.C.K. chapter.


In the photo above you can see a picture of (from left to right), Amanda of A Few Shortcuts, who gives you all the latest shopping bargains, recipes, and homemaking hints from her Florida home, Amy the Savvy Celiac, and Shelly, who, though not a blogger (yet?) is an active member of the Minneapolis/St. Paul R.O.C.K. along with Amy.

And below you can see Cinde on the right (whom you already met above) and Linda, the Gluten-Free Homemaker, who has fantastic home cooking recipes and household tips on her Maryland-based blog. Linda is the brains behind Gluten-Free Wednesdays, a link up of GF menu ideas and recipes to help make meal planning a little easier for the GF cook.


Most of our day was spent in information sessions being peppered with questions about how we've had to retool our kitchens, pay more for food on our gluten-free diets, alter our shopping habits, and the extent of our advance planning for our dining out experiences. Being an assertive and passionate bunch, we bloggers also got to fling the pepper back by making our various needs and desires known.

Chief among our desires were:

- Better certification/testing of food labeled as gluten-free (especially without the chilling afterword "may be made in a facility that also processes wheat, tree nuts, milk, etc.")

- Ingredient lists that are shorter rather than longer and which contain less chemicals and less additives that are unrecognizable as food. As in "why is there ester of wood rosin in my frosting?

- Products that contain less white rice flour, more fiber and more nutritious GF flour choices

- Less expensive GF foods.

I think our voices were heard and am encouraged that General Mills is sincerely interested in improving their product line for its GF customers. The fact is that gluten-free consumers read labels with a vengeance; we have to because eating gluten makes us and our loved ones sick and because manufacturers frequently reformulate products and add gluteny things back into products with "new and improved taste".

While a lot of smaller companies have sprung up over the past decade to provide wonderful GF foods for us to enjoy and which are available in "regular" food markets, General Mills is by far the largest company and has the most resources to be able to really expand the availability of more GF foods in mainstream markets. I think we were able to give the company a lot of important information about cross-contamination, the range of gluten-sensitivity and -intolerance and our powerful individual stories about how we and our families have been affected by gluten. I know I learned a lot from my fellow bloggers and I thought I was pretty up to speed on GF issues.


We also got a little time in Betty's kitchen to bake some sweet treats, though the General Mills staff didn't realize that possible gluten-contamination of wooden utensils used to make all their many other previous baked goods was a health concern, so they were disappointed that our gang of bloggers was not partaking of their specially prepared sweets. I know that this was a good education for them.

I was a baking partner with Jill of Hey, That Tastes Good, who is a wonderful food photographer and GF food adventurer. I was already a fan of her blog, as we gave her Fried Calamari recipe a test drive recently and I became a kitchen hero. That used to be Dan's favorite appetizer when we would dine out in the pre-GF era.

Jill's the one not wielding the gluten-suspicious rolling pin.


From left to right, my other new blogger friends included the effervescent Maureen of Hold the Gluten, who writes her information-packed blog posts about cooking, travel and health news from New Jersey, Vanessa the Celiac Princess, a newlywed (check out her gorgeous wedding photos and the spectacular GF reception spread) and author of a much-dogeared and beloved cookbook at our house, "The Gloriously Gluten-Free Cookbook", Lyn of Lyn's Kitchen Adventures, an Oklahoma mom and splendid from-scratch baker who keeps things gluten, tree nut, peanut and sesame-free in her kitchen, and Shirley of Gluten-Free Easily, who finds the time to lead a celiac support group back home in Virginia when she is not blogging up a ton of recipes whose emphasis is on naturally gluten-free foods and whole foods.


Feel free to add comments about what you'd like to see in the best of all possible GF worlds and I will be happy to pass them along to my contacts at my next opportunity. I can tell you that General Mills is listening and made lots of staff available to meet with our group, so this bodes well for our future.

I hope you all find time to visit the blogs of my new GF friends and say hello. They are all wonderful women with lots to share and interesting points of view and I was inspired by them all.

Wednesday, October 27, 2010

A Fantastic Poblano Pepper for Home Gardens (and Kitchens): The Tiburon Pepper

Growing peppers in our Zone 4 garden zone is always dicey. If the tail end of our growing season has warm, sunny days and cooler nights, there will lots of fruit setting on our pepper plants. But if not, we will have lots of small fruit and definitely not an abundance of fruit.

With the Tiburon pepper, a dark green, glossy poblano variety, the rules were set on their ear. We got beautiful, sturdy plants with plenty of flowers and fruit, and they reached an unbelievable circumference of an inch or more at their stems. I had to put metal tomato cages around a couple of plants to hold them up when they started to tip over from their burden of fruit.


While the taste of these thin-walled peppers only had a mild kick, the oils from these peppers really made the skin on my hands burn so I used gloves after that experience and one time when I was chopping some up on a hot August night, I got a squirt of pepper juice on my forehead. I rubbed the offending juice off with a swipe of my hand and spread a burning ring of fire across my face that throbbed for the better part of an hour. So be forewarned! And use gloves. And maybe some eye protection if you don't wear eyeglasses like the Crispy Cook!


It's easy to preserve your Tiburon pepper harvest by dicing or slicing them up and slipping them into freezer bags. We also roasted some up and then froze them. They are too thin-skinned to peel, so I just roasted them whole in the oven, then pulled on the stem end to remove it and the seed core.


These gorgeous peppers were wonderful fried up with onions and garlic for omelettes and vegetable soups and stews and they kept on pumping out peppers through our abnormally long garden harvest season. They soldiered on through a light frost and didn't flag until we had a killing frost only a week and a half ago.

I'm sending this pepper post over to Weekend Herb Blogging, a weekly blog event started by Kalyn's Kitchen almost five years ago, and now headquartered by Haalo at Cook (Almost) Anything At Least Once. This week's host of WHB #257 is Almond Corner. She'll be putting up the WHB roundup after Sunday's deadline, so head on over there to see what other fantastic blog posts and recipes there will be featuring the edible members of the Vegetable Kingdom.

Tuesday, October 5, 2010

Chapchae: A Cellophane Noodle Stir-Fry, Gluten-Free and Tasty!

Shopping for naturally gluten-free ingredients in Albany's Asian markets has proven to be a fun and inexpensive way to try new foods and recipes. We try to get down once a month to stock up on rice varieties, spices, gorgeous fresh Asian produce and all kinds of exotic sauces, snacks and canned vegetables to experiment with.

On our last shopping trip I picked up a bag of gray-colored sweet potato noodles to play around with. They cost under $2 and looked intriguing. After a little research on Korean cuisine, I found this recipe for Chapchae (also known as Jabchae or Japchae) which is a traditional stir-fry of these noodles with sesame oil, sliced veggies, all slathered in a sweetened soy sauce. That would work!


The cooking directions on the back of the package were a little confusing, but I got them softened up for the pot by bringing a big pot of water to a boil and then soaking them in it, with the stove burner turned off, while I was busy chopping up my other Chapchae ingredients (about 15 minutes).

The cooked noodles turn absolutely clear, which is why they are also referred to as cellophane noodles or glass noodles. They also had a springy, gelatinous texture, kind of like Jello jigglers and would make a perfect bowl of "guts" for anyone's Halloween Haunted House.

We feasted on a delicious batch of Chapchae the first night and then had lots left over for the next day, when the noodles got even fatter and softer and absorbed more of the luscious sauce. While our package of cellophane noodles was made of sweet potato (actually botanically a yam) starch, other varieties of cellophane noodles are made of mung bean starch, but both would be good substitutes for wheat-based noodles in a gluten-free diet.


Here's my upstate New York version of Chapchae, which turned out great and can be adapted to use any other varieties of veggies you might want to add:

Chapchae

1 (12 oz.) pkg. sweet potato noodles (also called cellophane or glass noodles)

2 Tbsp. peanut oil

1 large onion, peeled and sliced thin
2 cloves garlic, peeled and rough chopped
1 bunch chives, snipped

3 cups tatsoi or boy choy, stems sliced and leaves rough chopped
1 lb. mushrooms, sliced
8 oz. firm tofu, drained and cubed

2 Tbsp. sesame oil
3 Tbsp. soy sauce (check ingredients to make sure it's gluten-free)
1 tsp. sugar

2 Tbsp. toasted sesame seeds (optional garnish)

Bring a large pot of water to a boil. Add noodles and turn off heat. Cover and let soak until softened, about 15 minutes.

Heat peanut oil in heated wok or large pot. Add onions, garlic and chives, and cook, stirring constantly, until onions are softened, 3-4 minutes. Add tatsoi and mushrooms and cook, stirring often, another 5 minutes.

Add tofu and stir in gently. Cook another 2-3 minutes to heat through.

Mix sesame oil, soy sauce and sugar together and stir to dissolve sugar. Add to wok and mix thoroughly. When heated through, remove from heat, sprinkle with sesame seeds and serve while hot.

Makes 6-8 servings.

I will be seeking out these cellophane or sweet potato noodles again on my next Asian market trip. I liked them clear and jiggly, while husband Dan preferred them when they were softer the next day, but both ways were really tasty. I can't wait to try them in my Cold Sesame Noodle salad recipe, as I think their texture will really give this great party dish a nice bite.

Am sending a bowl of this tasty Chapchae over to Cook, Eat, Play, Repeat, who is this week's host of Presto Pasta Nights, a long-running blog event where great cooks from around the world share their delicious posts and recipes about the World of Noodles. Check back with Cook, Eat, Play, Repeat after October 8 for a great roundup.

Monday, August 30, 2010

Pomodoro!, Pulcinella and the Glory of Summer Tomatoes

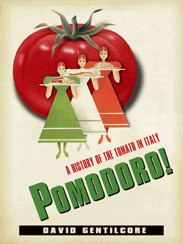
As noted previously here on The Crispy Cook, some blogger buddies and I were offered the chance to review copies of the new book "Pomodoro! A History of the Tomato in Italy", by David Gentilcore (NY: Columbia University Press, 2010) and we decided to put together a little blog event to roundup our thoughts about the book and to celebrate the tomatoes we all crave every season. If you would like to join us, please feel free to blog up something (including a recipe for a dish featuring tomatoes) and leave a comment below by our deadline of September 13, 2010 and I'll include you in the roundup.


Reading Professor Gentilcore's lively prose was a treat. I have enjoyed absorbing details of history through other food-centric volumes (Mark Kurlansky's "Cod" and Salt" are particularly good reads) and Pomodoro! was an entertaining romp through many centuries of Italian history. The tomato is not native to Europe, but was imported from the New World in the mid-16th century as a botanical curiosity for aristocratic gardeners. It was considered a plant that would dampen one's bodily humors and was not incorporated into everyday Italian cooking until the 1800s, when peasant women began sun drying tomatoes and tomato paste to supplement their farm incomes.

The struggles among Italy's various principalities and regions leading up to unification of Italy in the 1860s saw a general shift in prosperity from South to North. The proud Kingdom of Naples was reduced to a provincial capital and Neapolitans were mocked as bumbling, pasta-munchers in nationalist newspapers. Being poorer meant that Southern Italians ate less meat and more vegetables, and tomatoes soon zoomed to the top of the food pyramid.

Gentilcore's book has other interesting chapters about how the development of tomato varieties swung back and forth between Italy and the U.S. and how the waves of Italian immigration to America developed new tastes back home for tomato-heavy recipes. The chapter "The Autarchical Tomato", about how Mussolini's government used the tomato and home cooking iconography in its Fascist propaganda is similarly eye-opening, and overall the book is a great combination of scholarly detail and engaging writing that chronicles how the tomato slowly became an integral part of Italian culture.


Having some Neapolitan ancestors, the short description in the book about the commedia dell'arte stock character of Pulcinella, who represents Naples with his ever-present pot of macaroni, intrigued me to learn more. Commedia dell'arte is a stylized form of comic street theater which features masked actors and which flourished in Europe during the 16th and 17th centuries. Many characters originally developed to represent different regions, and Pulcinella, with his long-nosed black mask, oversized floppy clothes and sugarloaf hat, became a Neapolitan trickster type, who, when he wasn't loafing around gorging on macaroni, carried a cudgel to beat people with. If you've even seen a Punch and Judy show you'll see how Pulcinella evolved into the long-nosed evil assaulter, Punch, in English puppetry traditions. There is a Pulcinella Museum in Acerra, which would definitely be high on my itinerary if I get to visit Italy someday. In the meantime, I sketched a merrier version of the pasta-loving Pucinella to be my tomato muse in the kitchen.


And now to turn to the glories of the pomodoros, or golden apples, the tomatoes of summer! Ah, the beauty of a bowl of fresh garden tomatoes. It is the season when our family indulges in simple tomato sandwiches, tomato and cucumber salads, tomatoes tucked into pretty much every supper dish and our kitchen counters are filled with colanders and bowls of tomatoes awaiting canning and freezing.

I always grow at least 10-12 plum tomato plants in our home garden. They are meaty and fabulous for preserving, either as sauce or slow-roasted in the oven with salt, pepper and olive oil and then packed into freezer packs with fresh basil leaves. The other tomato varieties we like for immediate eating include whatever red and yellow varieties are offered as seedlings from the farmer around the corner and this year that included Striped German, a yellow and red heirloom variety with heavy fruit and some Supersteak and Celebrity tomatoes. And of course tomatoes need basil and garlic for neighbors, so I think my garden is fairly Italianate these days.

Since I already had put up some canned tomato sauce and spicy salsa this summer I thought I would attempt canning some tomato barbecue sauce. In honor of my saucy, spicy new friend Pulcinella, who also endears himself to me with his high-pitched voice and tendency to hop around like a chicken (pulcinella means little chick in Italian), I present this sweet and tangy tomato barbecue recipe:


Pulcinella's Barbecue Sauce

-adapted from the 1990 Ball Blue Book

8 quarts tomato puree
(I use my 4 quart crock pot to cook down cored, chunked tomatoes pretty much every night during tomato season. I turn the crock pot off in the morning and when things have cooled, I run the tomatoes through my food mill to get rid of seeds and skin and it makes a wonderful puree)

3 large onions, peeled and rough chopped
2 green bell peppers, seeded and rough chopped
2 red bell peppers, seeded and rough chopped
1 bunch celery, leaves and all, rough chopped
2-3 hot peppers, seeded and rough chopped (wear gloves)

1-1/2 cups brown sugar
5 cloves garlic, finely chopped
2 Tbsp. dry mustard
2 tsp. cayenne pepper
2 tsp. dried red pepper flakes
2 cups cider vinegar

Cover onions, bell peppers, celery and hot peppers with water in a pot. Bring to a boil. Lower heat and cook, covered, until vegetables are softened. Puree through food mill.

Put pureed veggies and tomato puree in large stock pot and bring to a boil. Lower heat to medium and keep at low boil until mixture thickens down to about half.

Stir in remaining ingredients and simmer, stirring occasionally to keep from scorching, until sauce is nice and thick, about 2 hours. Season to taste with salt and add more hot pepper flakes if Pulcinella advises you to.

Pour into sterilized pint jars, leaving 1/4 inch head space. Cap and process in a hot water bath for 20 minutes.

Makes 7 pints.

This is a slightly sweet barbecue sauce that is great for marinating vegetables and slathering on grilled zucchini slabs and portabella mushrooms. Pulcinella advises that it tastes great on roast chicken too.

I hope this post piques your interest in learning more about the history of tomatoes and seeking out Gentilcore's book, "Pomodoro!". You can read an interview with the esteemed author over at The Boston Globe and be sure to check back here after September 13th for the roundup of tomatoey posts.

Friday, August 20, 2010

Cook the Books Club: Climbing the Mango Trees and Picking the Beans with Madhur Jaffrey

The combo of daily sunshine, just enough rain and warm nights has produced a vegetable explosion in our home gardens this season, and the Crispy Cook has been pretty good at keeping up with the harvest by canning and freezing and cooking up armloads of tomatoes, basil, broccoli, cabbage, zucchini and peppers. I cut back on the number of plants (especially those super-fertile summer squashes) and the variety of veggies we usually grow, devoting about half of our garden space to garlic after seeing how successful that went with last year's first garlic harvest.

But I forgot about how prolific bean plants can be.

I usually grow one or two kinds of string beans each year and this year it was just half a seed pack of wax beans (those yellow string beans that are easier to spy on the green bean plants, I grew the Carson variety) that went into the ground in early summer. The bean plants just went wild this summer and it seemed like no sooner had I picked a colander full of crisp yellow beans, then there was another cluster hanging from the plants. My favorite way to enjoy wax beans is in a salad with tomatoes but after making this excellent dish several times, I turned to my cookbook shelf for more beany inspiration.


Since our foodie book club, Cook the Books, is currently reading Madhur Jaffrey's book "Climbing the Mango Trees: A Memoir of a Childhood in India" (NY: Alfred A. Knopf, 2006), I turned to her wonderful "An Invitation to Indian Cooking" (NY: Alfred A. Knopf, 1973). This is one of my most well-loved cookbooks since purchasing a paperback copy in a used bookstore many moons ago when I was first living and cooking on my own. I have since upgraded to a nice hardcover edition since my bespatterings and cracking of the spine beat up my original copy. I can recommend it wholeheartedly as a great introduction to the cuisine of Jaffrey's Delhi hometown, especially for American cooks who want to familiarize themselves with Indian ingredients and cooking techniques.

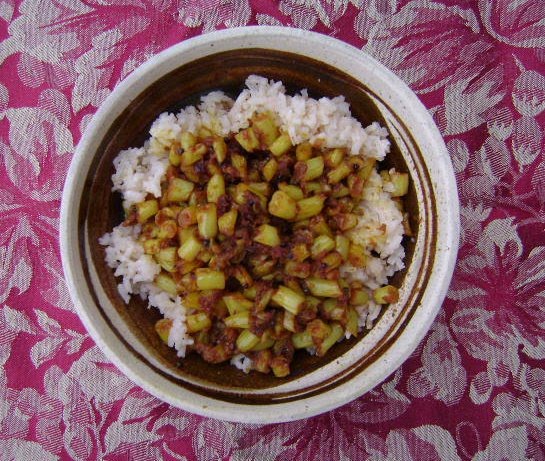
I found the perfect recipe to make: Green Beans with Onion Paste, which really deserves a much more glamorous name as it is redolent of so many spices. The beans are infused with so many levels of flavor as they slow cook in their tomato and onion gravy and it makes a hearty vegetarian meal over rice. Try it over basmati rice for extra fabulousness.


I have made the recipe twice now to rave reviews from my family. It is a slow food dish, requiring a good bit of time in the slicing of the beans, the sauteeing of the onion paste and spices, and then a bit of simmering, but the result is exquisite. You'll also creating a bit of work for the dishwasher, but they will lulled into submission when you make them this dish. Make a double quantity if you have a ton of beans, as I did and you'll have lots of great leftovers to savor.


Back to Jaffrey's memoir. At Cook the Books, participants read a book and then blog up a review and cook a dish inspired by their reading. I've already sung my praises of Jaffrey's great bean recipe, so now here are my thoughts about "Climbing the Mango Trees". Jaffrey provides another great introduction to Indian culture for Western readers with this autobiography. I learned so much about the complexity of modern Indian history from reading about her interesting family.


The Jaffrey clan lived as an extended family of up to 40 people, ruled by Babaji, the grandfather, in a sprawling orchard estate outside of Delhi in northern India. The Jaffreys were Hindus in this part of British India that was ruled by Moghul leaders that were Muslim, so the combination of cultures and religions during the 1930s-50s is interesting to read about. The family was well-off, so that servants cooked the meals. While little Madhur grew up to become a well-known food writer (and actress), she never spent much time in the family kitchen, though her childhood food memories are vivid indeed.

I was particularly enchanted by her description of a wintertime confection that an elderly lady dressed all in white used to bring by for a breakfast treat. Daula Ki Chaat was made by taking rich milk and mixing it with dried seafoam. The Lady in White would then ascend to her roof top and leave little terra cotta cups of this mixture to chill in the night air. In the morning, if the collected dew was in just the right amount, she would froth it up, adding a little sugar, dried sheets of milk and shavings of pistachio nuts. How's that for magical food?

Another evocative passage was about summer mango parties, which her mother called "sweetenings of the mouth", that were held to celebrate successful school exams. Madhur's mother would invite the family to sup on ice cream, rasgulla (cheese balls in syrup) and juicy mangoes and the image of them all whiling away a hot afternoon with jasmine in their hair, trying to avoid drips on their immaculate white saris and kurtas, has stayed with me.

Ms. Jaffrey provides plenty of other wonderful food-infused memories throughout her memoir, which ends when she leaves India by ship to attend the Royal Academy of Dramatic Arts in faraway London. That is where she began to pine for a taste of home, and where her adventures in cooking them up from her mother's handwritten recipes would begin. I look forward to reading what I hope will be another installment of this interesting and extraordinary life.

You can join me in reading, cooking and blogging about this wonderful book by the Cook the Books deadline of Friday, September 24, 2010. My CTB cofounder, Deb, of Kahakai Kitchen, is hosting this round and you can find out the details about how to participate on the Cook the Books website. Perhaps you will be inspired by the collection of treasured family recipes provided at the end of the book to join us at our Cook the Books roundup.

Monday, August 2, 2010

Z is For Zucchini

It is high summer here in upstate New York and it requires a couple of colanders to make the rounds of the garden each day, harvesting the abundance of vegetables and herbs that are flinging forth from the Crispy Garden. Zucchini plants are always fecund producers, so we've been enjoying lots of sauteed grated zucchini with butter, garlic and basil, zucchini stewed with tomatoes and basil and loading up the freezer with packages of grated, squeezed out zucchini so we can get our summer squash fix in the depth of winter.

While I've made other zucchini relishes and pickles before, I had never tried making a classic bread-and-butter pickle recipe using my garden squash bounty, but since we had a let up in the hazy, steamy weather this past week, I boiled up a vat o' water and got into canning mode. After perusing my canning library for inspiration, here's what I made:


Bread and Butter Zucchini Pickles

14 cups zucchini, trimmed and sliced into 1/4 inch slices

1/2 cup pickling salt

6 cups white vinegar

3-1/2 cups sugar

4 tsp. brown mustard seeds

2 tsp. celery seeds

6 dill heads


Layer zucchini slices with pickling salt in a big ceramic bowl. Cover with water, cover and let stand for at least 2 hours.

Drain zucchini and rinse salt off with cold water. Pat dry.

Make pickling brine in a large stainless steel or porcelain sauce pot. Combine vinegar, sugar, mustard and celery seeds. Bring to a boil, stirring to dissolve sugar. Lower heat and simmer for 5 minutes. Add zucchini slices and stir to coat with brine. Cover pot and let stand at least one hour (or overnight).

Sterilize 6 pint canning jars in a big hot water bath. Bring zucchini slices in brine to a boil and then pack into hot jars, popping in a dill head in each (I pop them in the middle of the jar). Fill jars to within 1/2 inch of top of each jar. Tap gently to remove bubbles, then seal and process in hot water bath for 10 minutes.

Remove from hot water bath and leave to seal by themselves overnight. Refrigerate any jars that haven't sealed properly.

Makes 6 pints.

These pickles came out very well. The zucchini is nice and snappy after the salting and the brine is sweet and tangy like a good sweet pickle should be. Perfect.

For other zucchini harvest ideas, take a look at these recipes from the Crispy Vault:

Zucchini Trifolati

Zucchini Pizza on Gluten-Free Crust


Spicy Zucchini Relish

Stuffed Grape Leaves with Zucchini and Cilantro

Cream of Ratatouille Soup

Spinach-Zucchini Soup with Fennel Seed

Nightshade Ragout


Zucchini Tonic


I'm sending this vegetable contribution over to Katie at EAT THIS!, a fellow gluten-free food blogger and gastronomic adventurer who's hosting this week's round of Weekend Herb Blogging. You can find out more about this weekly food event at the Australian headquarters of Cook (Almost) Anything At Least Once. Look for an interesting roundup of vegetastic recipes and posts after the Sunday deadline over at EAT THIS!

Thursday, July 29, 2010

Cook the Books Club: The School of Essential Ingredients

Imagine a serene restaurant somewhere in the Pacific Northwest where the gentle instructor guides a small group of food lovers in the art of cooking and not so incidentally in understanding how to solve their own problems in life. Students learn not only to overcome their fears in whacking live crabs for the pot and tackling new recipes with confidence, but come to understand themselves better through their work in the kitchen.

Such a place exists in the great novel written by Erica Bauermeister, "The School of Essential Ingredients", which is the current selection of The Cook the Books club, an online foodie book club. Though each reader will no doubt have different interpretations about what the Essential Ingredients might be in cooking and in life, I came away with the idea that love, acceptance, time and self-contemplation should be part of the mix in cooking for one's loved ones.

Our heroine is restaurateur Lillian, whose own story is about an unsettled childhood in which her mother has retreated into years of obsessive book reading after a bruising divorce. The back stories of the other characters at the School of Essential Ingredients are doled out slowly throughout the novel and it is an interesting cast of people with different backgrounds and problems that unfold as the cooking lessons progress.


Bauermeister writes lyrically and there is much to savor in her sensual writing. I found that I wanted and needed to read the book a second time to fully experience the nuances in her prose and I have to say that I enjoyed the rereading even more. There's poetry in there, and philosophy, and delicious bits of foodie prose too, so it was a thoroughly satisfying read that I would recommend highly.

Cook the Books participants read our selected book every other month and then blog up their thoughts along with a culinary dish (and sometimes a whole feast!) inspired by their reading. I had originally planned a CTB post featuring a special dessert that was slow food indeed, highlighting my special appreciation for TIME as one of Essential Ingredients, but then obstacles to my blogging life started to accrue.

After suffering a spate of technical difficulties this steamy summer with the various mechanical devices in my life (fried hard drive on my beloved ten year old computer, car problems, clothes dryer (air drying hasn't been terribly effective this hazy, humid summer), garden hose nozzle, food processor, digital camera, stove burners) I was beginning to wonder if I would be able to get my blog post up for this round of Cook the Books. I am the host this round, so there has been extra pressure to get cracking, but my primary blogging tools have been altered indeed.

I actually had most of a nice, informative post on making a simple syrup of anise hyssop, which I stewed some stone fruit in for a cool, perfumed dessert one of these hot nights, but my photos and musings were zapped inside my old computer. Fortuitously, I was able to figure out how to use my daughter's camera to take some shots of a new dish inspired by our CTB book and after figuring out how to drive on my new computer and its operating system, my blogging is back in business. I think Lillian would be nodding her head at me in approval right now.

What I present to you all then, as my Cook the Books dish, is a cool eggplant salad, featuring the Essential Ingredient of Love. I made this dish for my husband to consume upon his return from a terrifically sweaty and dusty weekend away with my youngest daughter at a softball tournament. Though we packed Dan up a cooler of gluten-free delights to nosh on during the weekend, he was down to snacking on corn chip dust and water by the end of his travels (concession stands at hometown sporting events are notoriously gluten-packed) and when he returned from his exhausting odyssey I was there to comfort him with sweaty kisses, clammy hugs and a bowl of this cooling salad, made with garlic, shallots and basil from our garden.


This dish is adapted from a much-loved and dog-eared staple in my personal cookbook library, Bert Greene's "Greene on Greens".

Fried Eggplant Salad with Shallots, Lemon and Basil


1 large eggplant
Salt
Olive oil
2 shallots, peeled and sliced thinly
2 cloves garlic, peeled and finely chopped
Juice of two lemons
Salt and pepper to taste
1/2 cup basil, thinly sliced

Trim ends off eggplant, and then slice in half lengthwise. Slice each section into 1/4 inch thick half moons. Place eggplant slices in a colander in the sink and sprinkle them liberally throughout their layers with about 2 tsp. salt. Let stand 30 minutes.

Using paper towels, brush as much salt off the eggplant slices as you can and give them a squeeze to drain off excess liquid.

Heat 2 Tbsp. olive oil in a large frying pan. Place eggplant slices to cover bottom of pan. Drizzle with a little more olive oil and then fry until lightly browned, about 2-3 minutes per side. Remove eggplant to dish lined with paper towels. Add another bit of olive oil to the pan to coat the bottom, heat and then continue frying up all the eggplant.

When all the eggplant is cooked, pour another 2 Tbsp. olive oil into the pan and heat it up. Add shallots and garlic and saute, stirring occasionally, until they are soft and golden brown, about 7 minutes.

Find a beautiful serving dish and layer the bottom with a layer of fried eggplant and then some of the fried shallots and garlic. Sprinkle with some of the lemon juice and sliced basil. Sprinkle with a dusting of salt and pepper. Repeat layers twice.

Serves 6. This seemed tastiest served at room temperature, but we also enjoyed it cold straight out of the refrigerator.

I will be posting a roundup of all the savory and exciting blog posts about "The School of Essential Ingredients" after our deadline, which is tomorrow, July 30, 2010. The author herself, Erica Bauermeister, will be serving as the guest judge for our posts, so tune in to Cook the Books over the course of the next week to see what we all thought about the novel.

For our next book selection, we will be reading Madhur Jaffrey's "Climbing the Mango Trees: A Memoir of a Childhood in India". Anyone can join in the fun at Cook the Books; all you need to do is read the book, blog about your thoughts and cook up a dish inspired by your reading. Please join us!

Tuesday, June 15, 2010

Roasting Up Some Garlic Scapes for WHB #238

I am delighted to announce that The Crispy Cook is once again the guest host of Weekend Herb Blogging (Number 238!), a weekly blog event that celebrates all posts herbaceous, vegelicious and fruitastic. Weekend Herb Blogging was started by Kalyn's Kitchen and has been organized by Cook (Almost) Anything At Least Once for the last year.


From now until Sunday, June 20, 2010 I will be happy to accept recipes featuring plant ingredients (herbs, vegetables, fruits, seeds, stems, flowers, etc.) Entries must be submitted by:

* 5 pm Sunday - New York City Time (EST)
* 3pm Sunday - Utah Time
* 10pm Sunday - London Time
* 11pm Sunday - Rome Time
* 9am Monday - Melbourne (Aus) DS Time.

Your post can be informative, spotlight a particular ingredient and/or include a recipe where your chosen ingredient is one of the primary ingredients in the recipe. WHB posts must be written specifically for this blog event and may not be cross-posted in other events. Your post must include a link to The Crispy Cook and to the WHB rules page.

If you have a great veggie recipe to share this week, please send your posts to oldsaratogabooks AT gmail DOT com with WHB#218 in the subject line and the following details:

Your name Your Blog/URL
Your Post URL
Your Location
Attach a Photo: 250px wide

For my contribution to this week's WHB edition, I turned to what's flying out of the Crispy Garden, and this week it is garlic scapes. Scapes are the flowering stalks that emerge from the garlic plant and are trimmed if the home gardener or farmer wants the garlic plant to save all its plant energy for making a juicy and delicious garlic bulb to be harvested next month. I planted a boat load of garlic last November and have a handsome crop of various varieties of garlic that have been sending up scapes for the past week or so.

We've been using them just like scallions, chopping them into stir-fries and whizzing them up into Herbed Cream Cheese and Creamy Garlic Scape Dressing. They taste like a mild garlic and as you can see below we have a a real abundance of scapes.


I did a little Internet research to see what other ways cooks were using for their scapes and found this blog post gem in which the fanatical scape-lover author and self-described Crazy CSA Lady provides seven fabulous ways to cook with garlic scapes. This is followed by many more tantalizing comments in which other scape nuts mention different ways to use their beloved alliums. One commenter talked about roasting them so that is what I did, tossing them with olive oil, salt and pepper and then roasting them in a 425 degree oven for 30 minutes, stirring twice.


The roasted scapes are nice and crispy at their pointed little ends (though you must be careful not to skewer the inside of your mouth when you fork them in) and have a mild roasted garlic flavor. We ate them over green salads and as a pasta garnish and I still have others to use later on. Perhaps I will chop some up and freeze them to use later. Let me know if you have other fabulous ideas for roasted scapes.

Looking forward to seeing what's cookin' in your kitchen this week. I've already had several cool WHB submissions and can't wait for more to include in the roundup.