Wednesday, April 4, 2012

Gluten Free Coconut Blondies

The March baking challenge at the Gluten Free Ratio Rally was brownies, as selected by our host, Frannycakes. The Gluten Free Ratio Rally tackles a different recipe each month using ingredients measured by weight rather than volume and in ratios of liquid: egg: flour: fat: sugar, etc.


I already have a good workhorse recipe for gluten-free brownies in my copy of Elizabeth Barbone's Easy Gluten-Free Baking cookbook. The Betty Crocker GF brownie mix also makes good chewy brownies in a hurry and I use them in this shortcut recipe for a crunchy, cinnamony Mexican Brownie which is really a winner with my crew. So the upshot is, for this Rally I wanted to try a chocolate-less brownie, a blondie.

Then there was this bag of Coconut Powder that caught my eye at the Asian market and has been idling in my baking cupboard for many moons. I have used coconut flour in baking before and enjoy the results, though coconut flour is one thirsty ingredient, requiring a lot of extra liquid in a recipe. I also think it's expensive ($6.49 for a 1 lb. bag at my local health food store). The 2 lb. bag of Coconut Powder cost me $4.99 at the Asian market. The texture is different between the two products: Coconut Flour is silky fine, whereas the Coconut Powder is chunkier and reminds me of panko bread crumbs. I also needed to fish out some bigger chunks of coconut from the Coconut Powder that must have escaped the grinding blades when I was sifting my dry ingredients. Given the price difference between the two products, though, I definitely wanted to play around a bit more with the Coconut Powder.

On the face of it, Coconut Powder seems to be a dessicated, ground up bit of unsweetened coconut meat (and one blogger uses it to make homemade coconut milk) that I thought would add some fiber to my intended blondies. I also wanted to use up the last bit of coconut oil in my pantry and thought that adding in toasted, sweetened flaked coconut would make an awesomely good Triple Coconut Blondie, enhanced with a little bit of chocolate chips.


That was my vision, anyway. When I baked up my first blondie batch, inspired by this toothsome sounding recipe, augmented by even more fiber in the form of ground flax seed and rolled oats, the end result was dry, heavy, and a bit TOO much of a colon cleanser.  They were kind of flat too. We ate them, but they were not decadent and moist like a good sweet treat should be.

My second coconut blondie batch left out the oats and flax seed, subbed in a chick pea/tapioca starch/brown rice flour blend and used butter instead of coconut oil and things did improve, but the texture of these coconut blondies still screamed 1970s era health food. Plus all the chocolate chips still kept sinking to the bottom of the blondies instead of pleasantly inserting themselves throughout.

 
Time to rally back by tinkering with the ratios and ingredients once again.

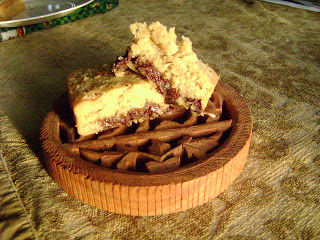
For my third try, I upped the brown sugar, subbed out chocolate chips for chopped walnuts and added in more toasted flaked coconut. That did the trick; these Double-Co, Double-Nut Blondies were chewy, richly flavored and awesomely good paired with a cold glass of milk.


Co-Co-Nut-Nut Blondies

Vegetable shortening

100 grams coconut powder (feel for lumps of unground coconut and fish them out)
100 grams brown rice flour
25 grams tapioca starch
25 grams chick pea flour (all together you will have about 2 cups flour)

1/4 tsp. baking powder
1/4 tsp. baking soda
1/2 tsp. xanthan gum
1/4 tsp salt

300 grams brown sugar (about 1-1/2 cups)
75 grams butter (about 1/3 cup)

2 eggs, lightly beaten
1/2 tsp. vanilla
1/4 cup water

1 cup sweetened flaked coconut
1 cup chopped walnuts

Grease an 8 x 8 inch baking pan with shortening. Set aside.

Place flaked coconut in an ungreased frying pan. Adjust heat to medium high, and stay right there, stirring continuously, until it toasts to a nice golden brown, about 5-7 minutes. Don't let your coconut burn! Let cool and reserve a couple of tablespoons of the toasted coconut to sprinkle on top of your blondie batter before baking.

Preheat oven to 350 degrees F.

Mix coconut powder, brown rice flour, tapioca starch, chickpea flour, baking soda, baking powder, xanthan gum and salt together until blended.

In a pot on the stove, melt butter. Add in brown sugar and heat, stirring, until it is melted together. Let cool for 5 minutes. Stir in vanilla, eggs and water.

Mix wet ingredients into dry ingredients just until blended. Add nuts and toasted coconut and mix just until blended. Spoon into prepared baking pan, top with reserved toasted coconut and pop in the oven for 30 minutes or until top looks dry and edges have separated from the pan.


Let cool in pan on a rack. When completely cooled, cut into squares.

Makes about 16 blondies.

Be sure to check over at Frannycakes to see all the other inspired brownie and blondie variations made by other GF Ratio Rally bakers.


Tuesday, April 3, 2012

Pizzoccheri: A Sublime Gluten Free Buckwheat Noodle Dish

I recently finished an intriguing novel about Amsterdam, the South Seas, bizarre sexual rites and sculpture, the operation of a restaurant, and spices, entitled Mangoes and Quince, and found out that the author, Carol Field, is a seasoned cookbook writer. Wanting to make her better acquaintance, I bought a copy of her cookbook, In Nonna's Kitchen: Recipes and Traditions from Italy's Grandmothers, and pored over all the great recipes, biographies of various grandmas (nonnas) and food lore.

Most everything in all of the thrifty nonnas' kitchens contained the dreaded wheat: soups poured over slabs of toast, bread crumbs extending various meat and vegetable dishes, wheat and semolina in most every pasta. Then I got to Nonna Esther's recipe for Pizzoccheri, a specialty of the mountainous northern region of Lombardy, that makes use of the native buckwheat flour. Buckwheat, despite the second syllable in its name, is not a member of the gluten-ous wheat family, but is instead ground from the seed clusters of a plant more closely related to rhubarb.


Buckwheat flour has a hearty, nutty flavor and it's always in my baking cupboard to add to various gluten free flour mixes (it is really a hero in pancakes and muffins). Checking to see that I also had chickpea flour (for savory flavor), tapioca starch (for elasticity) and brown rice flour (to extend it all), I put together a gluten free flour mix, heavy on the buckwheat, for some homemade pasta.

Pizzoccheri is a layered dish of buckwheat noodles, sage, potatoes, cabbage, melted cheeses and a garlic-butter sauce. It was a worryingly monochromatic palette as I assembled my ingredients, but with the dark green addition of some spring chives from the garden, things looked a little less like a whiter shade of pale. Nonna Esther's recipe also called for Savoy cabbage, which would have added a darker green than my regular cabbage substitute, but I was too cheap to spring for the three times as expensive Savoy.

My pasta flour was easy to roll out but was fairly brittle, so I wasn't able to make the traditional four inch long tagliatelle strips. Instead, I made stubby little rectangles about 2 inches long by 3/4 inches wide and let them rest, well-floured, on a couple of cookie sheets.

This Pizzoccheri really made a luscious supper. I cut back on the amount of butter by half, substituting a drizzle of olive oil, but even so, there was enough oil to glisten up the whole bowl. I would even add more frizzled chives, garlic and sage the next time, and definitely some more cabbage. These herbs and vegetables not only added a welcome bit of color but the crispiness of the fried dried sage was a nice contrast to the softness of the rest of the ingredients.


Pizzoccheri is just sublime - fun to pronounce and lovely to eat. It's a wonderful rustic pasta dish to add to your repertoire. It takes some time to roll out the pasta dough and get everything chopped and ready for the cooking and assemblage, so it's something to make on a luxurious weekend afternoon, but I have been advised to add it to our Crispy Crowd menu rotation.


Here's the recipe, adapted from Carol Field's In Nonna's Kitchen (NY: HarperCollins, 1997).  

Pizzoccheri

1/2 cup brown rice flour
1/4 cup tapioca starch
1/4 cup chick pea flour
2 cups buckwheat flour

1 large egg, beaten well
1/2 tsp. salt
2/3 cups water

3 red potatoes or other waxy boiling potato, peeled and cut into walnut-sized chunks
8 oz. Savoy cabbage, leaves separated and cut into long, thin strips (I used regular white cabbage, with thick cores and ribs trimmed away. And next time I would double the amount of cabbage)

1 stick butter (the original recipe called for 1-3/4 sticks butter, but this would have been too rich for our palate)
Olive oil
8 garlic cloves, peeled and slivered
2 Tbsp. dried sage, crumbled (or use a few leaves of fresh sage, roughly torn, as called for in the original recipe)
1/3 cup snipped fresh chives (I would use even more next time)

2 cups Fontina cheese, cut into 1/2 inch cubes
1 cup grated Parmesan
Salt and Black Pepper to taste

Put a large soup pot of water (about 4-5 quarts) on the stove over high heat and bring to a boil.

While the pasta water is heating up, mix flours and salt in a large mixing bowl. Add egg and water and blend together well. Dust your work surface and rolling pin with extra flour (I used brown rice flour) and pinch off one quarter of the pasta dough to roll out. Cover the remainder with plastic wrap or a damp towel to keep from drying out.

Roll out dough as thin as you can while having it still hold together. I got to almost a 1/4 inch thickness. Cut dough into short rectangles, about 2 x 3/4 inches, using the edge of a thin spatula. Let pasta rest, dusting with additional flour, on a baking sheet, while rolling out the rest of the dough.

Melt butter in a frying pan. Add in a little bit of olive oil to raise the frying temperature of the butter-oil mix without having the butter burn. Add the garlic slivers. Stir constantly, until garlic and butter is lightly browned, about 3-4 minutes. Do not let things burn or you will get an acrid, instead of mellow taste. Add in sage and chives. Let things frizzle up until the herbs are CRISPY. Remove from heat.

When pasta water has reached a full, strong boil, add in a handful of coarse salt and watch that bubble up. When it has come to a second boil, throw in potato chunks. Let them cook about 2-3 minutes, until they are just beginning to get tender. Throw in cabbage strips and cook another 3-5 minutes, until they are on the way to being tender too. Then add in pasta and bring to another boil, skimming off the foam that keeps rising to the top of the pot. When pasta is al dente, about 4-5 minutes, turn off heat and drain your pot in a colander.

Put some olive oil in a big pasta serving bowl to coat the bottom. At this point, Nonna Esther speaks of layering pasta separately from the cabbage and potatoes that it has been cooked with, but I don't see how that would be possible, since they were all mixed together. Perhaps a step was left out in the original instructions about removing the potatoes and cabbage with a skimmer before adding the pasta, but in any event, put a layer of your pasta-cabbage-potatoes in the bottom of the oiled serving bowl.

Top with half of the cubed Fontina and grated Parmesan. Drizzle a little of the garlic-butter-herb sauce on, sprinkle with a little salt and pepper and then repeat a second layer of everything. Serve immediately with plenty of napkins to wipe your buttery chins.

Makes 4-6 hearty supper servings or more "primi piatti" smaller servings.

I'm linking this post with Presto Pasta Nights, a weekly blog event that focuses on the infinite glories of the world's noodle varieties, founded and hosted this week by Ruth of Once Upon a Feast. Ruth will have a no doubt tasty roundup of all these Pasta blog posts this Friday night.